Since I've been a SAHM and we have cut our income almost in half, I have been very interested in ways to save money, save time, simplify, and overall make a safe and happy home for my little family.
Homemade cleaners and beauty products have been on my radar for a while now. I am becoming increasingly concerned about chemicals present in our house now that we have little ones who stick everything in their mouths hanging out here and while I don't spend much money on beauty products, I spend a small fortune on cleaning supplies. If these homemade natural recipes make my home safer and save us money, what am I waiting for?
To be honest, I haven't pulled the trigger yet because I do not trust such things. If vinegar really sanitizes, why did they make bleach? I was raised to trust and rely on chemicals to sanitize my world. And make my own shampoo, conditioner, body wash...?? Really? But those ready to buy bottles at the store require not thought at all. But, I guess that's what I want to change. I want to put some thought into what we use on our bodies and in our home. I am not a hippy dippy chick or an environmentalist (not that those are bad things, I just am not), but I am woman who loves her family who wants to make the very best decisions for them.
So, all that being said, I am going to start some trials of all the natural homemade recipes I have seen that have piqued my curiosity. I'm still not sure how I will decide on all of them. For instance, am I going to swab my toilets after washing with homemade cleaner and after a store bought cleaner and have them tested at a lab for bacteria levels? Probably not, but it seems like that would be a good thing to know. We'll see.
Anyway, here's my list of things to try that are already in the works:
-No Poo (shampoo) hair washing
-Homemade body/face wash
-dry brushing
-coconut oil as a moisturizer
That's all for now. So I guess it appears as though we will start with the personal care items huh?

Monday, February 18, 2013


Friday, July 6, 2012
Microfiber Magic!...Oh and hello again.
Long time no blog! :)
Yes, I stink at blogging. I was busy being pregnant and then busy figuring out how to balance the kid and everyday life. I still don't have it down quite yet. Next week maybe...
All I have for you today is a little tip. It is not a new tip, but one I was hesitant about myself. So, I am letting you know, I have tried it and it is awesome. Use microfiber towels on your sweeper instead of the disposable sheets sold in the box. I thought they wouldn't work as well and the people who suggested it might be those weird frugal people who use (and reuse) old rags as toilet paper. Creepers.
But alas... it works! And dare I say BETTER than the name brand disposable rags. The microfiber towels I bought were cheap too ($5 for a pack of 10 at Walgreens...this was a while ago, so I'm not sure if they still have them).
So, give it a shot. Considering how much a box of those costs, I think this will add up to be a significant money saver over the course of a year (and not disgusting like the t.p. rags).
Yes, I stink at blogging. I was busy being pregnant and then busy figuring out how to balance the kid and everyday life. I still don't have it down quite yet. Next week maybe...
All I have for you today is a little tip. It is not a new tip, but one I was hesitant about myself. So, I am letting you know, I have tried it and it is awesome. Use microfiber towels on your sweeper instead of the disposable sheets sold in the box. I thought they wouldn't work as well and the people who suggested it might be those weird frugal people who use (and reuse) old rags as toilet paper. Creepers.
But alas... it works! And dare I say BETTER than the name brand disposable rags. The microfiber towels I bought were cheap too ($5 for a pack of 10 at Walgreens...this was a while ago, so I'm not sure if they still have them).
So, give it a shot. Considering how much a box of those costs, I think this will add up to be a significant money saver over the course of a year (and not disgusting like the t.p. rags).
Friday, August 19, 2011
What's Baking?
Lately I've been busy baking something extra special. A bun. As in a baby! I am 20 weeks along today (due January 6th) and can not believe we are half way there! We found out last week that we are having a precious little boy. We love you baby and can't wait to meet you.


Thursday, March 24, 2011
Homemade Pimento Cheese
Recently my husband and I took a weekend trip down to Charleston, SC for a friend’s 60th birthday celebration. The night before the party we took the opportunity to try one of downtown Charleston’s exceptional restaurants. We chose Magnolias and we were not disappointed. My husband was particularly awed by their grilled filet of beef topped with their house made pimento cheese. We had never thought of pimento cheese as a topping for steak and my honey just loved it. So, guess what he requested the next time we grilled steaks?
There are probably many places I could have just picked up some pre-made pimento cheese, but where’s the fun in that? So after perusing various recipes on the internet, I decided on this which I adapted from several different recipes. We both really like how it turned out and we used the leftovers on our sandwiches instead of sliced cheese and other condiments foe the rest of the week. My particular favorite was turkey, pimento cheese and bell pepper.

8 oz reduced fat cream cheese
1 c extra sharp white cheddar cheese, grated
1 c sharp cheddar cheese, grated
1 1/4 c pepper jack cheese, grated
1/2 c light Duke’s mayonnaise
1 1/2 tsp red wine vinegar
4 oz chopped pimentos
1/2 tsp onion powder
1/2 tsp garlic powder
1/2 tsp paprika
3 dashes hot sauce
Fresh ground black pepper to taste
Directions:
Mix all ingredients except half of the grated cheese in a food processor until smooth.
Once blended put the other half of cheese in the processor and pulse until combined. I like to do leave it a little chunky. If you want it completely smooth that is fine.
Cover and chill for at least an hour before serving
There are probably many places I could have just picked up some pre-made pimento cheese, but where’s the fun in that? So after perusing various recipes on the internet, I decided on this which I adapted from several different recipes. We both really like how it turned out and we used the leftovers on our sandwiches instead of sliced cheese and other condiments foe the rest of the week. My particular favorite was turkey, pimento cheese and bell pepper.

8 oz reduced fat cream cheese
1 c extra sharp white cheddar cheese, grated
1 c sharp cheddar cheese, grated
1 1/4 c pepper jack cheese, grated
1/2 c light Duke’s mayonnaise
1 1/2 tsp red wine vinegar
4 oz chopped pimentos
1/2 tsp onion powder
1/2 tsp garlic powder
1/2 tsp paprika
3 dashes hot sauce
Fresh ground black pepper to taste
Directions:
Mix all ingredients except half of the grated cheese in a food processor until smooth.
Once blended put the other half of cheese in the processor and pulse until combined. I like to do leave it a little chunky. If you want it completely smooth that is fine.
Cover and chill for at least an hour before serving
Thursday, March 3, 2011
Red Flannel Hash
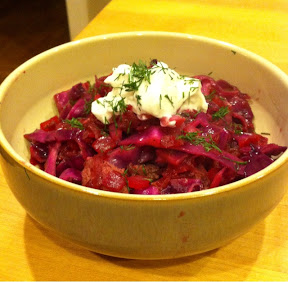
I don’t know if I was an overly picky eater as a child, but I do remember not being very open-minded. I wanted to stick with foods I knew. The basics. So, when I saw this bright purple recipe in the latest issue of Cooking Light, and thought, “Wow! That sounds delicious and I would really like to try something different”, it made me think of my Mommy. She spent years trying to get me to try new things with little success. She might even be annoyed at how easily this magazine convinced me to try something so different. Sorry Mom! I think it’s like when you can’t get a new jar open. You try and try and try, but you can’t get it to budge. So, you finally breakdown and ask your husband to help and he pops it open no problem. Psssh! You definitely loosened it for him. Get it Mom? I’m the jar and I guess Cooking Light magazine is your husband? Just go with me on this one. Thanks for loosening my lid Mom!
Ingredients
• 2 tablespoons olive oil
• 8 ounces ground turkey
• 1 cup chopped red onion
• 1 teaspoon kosher salt, divided
• 1 teaspoon ground black pepper
• 1/2 teaspoon ground cayenne pepper
• 3 garlic cloves, minced
• 2 cups shredded red cabbage (about 1/2 small head)
• 2 cups grated beet (about 3 medium beets or 1 to 1-1/2 canned beets drained)
• 1/2 cup water
• 4 tablespoons cider vinegar
• 1/4 cup plain fat free Greek yogurt
• 2 tablespoons chopped fresh dill
Preparation
1. Heat a large skillet over medium-high heat. Add oil to pan; swirl to coat. Add beef to pan; cook 4 minutes, stirring to crumble.
2. Add onion, 1/2 teaspoon salt, pepper, and garlic; sauté 5 minutes or until translucent.
3. Add cabbage, beet, water, vinegar, and remaining 1/2 teaspoon salt; cook about 10 minutes or until cabbage begins to wilt and liquid almost evaporates. I chose to cook this a little bit longer to make the cabbage a little tenderer. I recommend that you taste the cabbage until it is cooked to your liking. I think I cooked mine for about 15-18 minutes and it still had a bite but was definitely not crispy any more.
4. Spoon 1 1/4 cups hash into each of 4 serving bowls; top each serving with 1 tablespoon yogurt and 1 1/2 teaspoons dill.
Nutritional Information (thanks Cooking Light for always providing this info!):
Calories 187 • Fat 9.8g (sat 2.2g, mono 6g, poly 1g) • Protein 14.3g • Carbohydrate 12.7g • Fiber 2.9g • Cholesterol 31mg • Iron 1.9mg • Sodium 577mg • Calcium 50mg
Adapted from Cooking Light March 2011 issue
Thursday, February 17, 2011
Gooey Butter Cookies
“Gooey” is not an appetizing adjective to me. There used to be an old Taco Bell commercial with the Chihuahua advertising a particularly cheesy burrito and the little dog kept saying, “Gooey, gooey cheese”. I think that’s what did it for me. Take any word, associate it with Taco Bell and it takes away the appeal to me.
However, “gooey” might be moving up a notch or two in my book after making these cookies. These cookies were beyond delicious. Love, love, love them! I think you will love them too.

Ingredients:
- 1 egg
- 1 box yellow cake mix
- 1 (8 oz.) cream cheese, softened
- 1 stick softened butter
- 1 tsp. vanilla extract
- Powdered sugar for rolling and dusting
Directions:
- In a large bowl with a mixer, cream together butter and cream cheese until smooth.
- Beat in the egg, then beat in the extract. Beat in the cake mix.
- Cover and refrigerate until firm enough to roll (2 hours to overnight if preparing in advance).
- Preheat oven to 350 degrees.
- Place powdered sugar in a bowl set to the side.
- Roll chilled dough in to tablespoon size balls and then in the powdered sugar.
- Place on an ungreased cookie sheet, 2 inches apart and bake 12 minutes. The cookies will remain soft and gooey.
- Cool completely and sprinkle with extra powdered sugar if desired.
Cinnamon Pound Cake
This holiday season was SO busy for us. It was so busy in fact, that I am just now posting some of my favorite recipes that I made.
The goal of this year’s (OK, it’s last year’s now) baking was easy and quick (and preferably delicious). I found this recipe on a fellow bakers blog. It was a big hit and so easy to make. I am definitely filing this one away for future use! I even found a pretty Christmas wreath shaped bunt pan to use.

Ingredients:
The goal of this year’s (OK, it’s last year’s now) baking was easy and quick (and preferably delicious). I found this recipe on a fellow bakers blog. It was a big hit and so easy to make. I am definitely filing this one away for future use! I even found a pretty Christmas wreath shaped bunt pan to use.

Ingredients:
- 4 tablespoons sugar
- 2 tablespoons cinnamon
- 1 yellow butter cake mix (don’t use white cake mix – it has to be butter)
- 1 package instant vanilla pudding
- 1/2 cup vegetable oil
- 1 8-ounce container sour cream
- 4 eggs
- Preheat oven to 350 degrees and grease a bunt pan.
- Mix the sugar and cinnamon together in a small bowl and sprinkle half of the mixture in the greased bunt pan – shake it all around to coat the entire pan.
- Mix cake mix with pudding, oil, sour cream, eggs and other half of cinnamon/sugar mixture.
- Pour into pan and bake for 45 – 50 minutes until springy. Cool for 20 minutes before taking out of pan.
Friday, December 10, 2010
Not-so-determined Blogger
Boy have I let this fall through the cracks. In my efforts at domesticity, I have been unable to be a successful blogger.
My downfall started with the tailgating season. We stay so busy going to all the Clemson home games and preparing food for large groups of people, I can barely keep the house in order. In fact if you were to ask my husband, he might say that I did not in fact keep the house in order. So, just don't ask him, okay?
Then, immediately following football seasons, the holidays started creeping up on me. Actually, football and the holidays did a little overlap and effectively kicked my butt.
However, one of the main (and saddest) reasons I have not been blogging lately is that I've been too tired and lacked the self control to plate and take a pictures of everything I cook before the hubs and I scarf it down. A post without a picture just isn't the same, and the fat girl part of me is more powerful than the blogger part. Sigh...
I will try harder folks. Not because I think you care (I do not have the audacity for such bold assumptions), but because I made a HUGE deal about starting a blog only to let it die off after only a handful of posts and now I am embarrassed. I hope to get a few more posts up in the next few days. I will do it for the people and for pride! Haha.
Humbly,
The Determined Domestic/Blogger
My downfall started with the tailgating season. We stay so busy going to all the Clemson home games and preparing food for large groups of people, I can barely keep the house in order. In fact if you were to ask my husband, he might say that I did not in fact keep the house in order. So, just don't ask him, okay?
Then, immediately following football seasons, the holidays started creeping up on me. Actually, football and the holidays did a little overlap and effectively kicked my butt.
However, one of the main (and saddest) reasons I have not been blogging lately is that I've been too tired and lacked the self control to plate and take a pictures of everything I cook before the hubs and I scarf it down. A post without a picture just isn't the same, and the fat girl part of me is more powerful than the blogger part. Sigh...
I will try harder folks. Not because I think you care (I do not have the audacity for such bold assumptions), but because I made a HUGE deal about starting a blog only to let it die off after only a handful of posts and now I am embarrassed. I hope to get a few more posts up in the next few days. I will do it for the people and for pride! Haha.
Humbly,
The Determined Domestic/Blogger
Monday, October 25, 2010
Weekly Meal Plan
Holy cow have I been busy! I have so many new cooking adventures to blog about but have not had any time to sit down to do it. I am currently blogging in my car (it is parked) on my iPhone during my lunch hour.
One of my best tools for staying organized and saving time is planning my meals for the week. This keeps us from eating out, eating frozen food, and me from having to make multiple trips to the grocery store for one missing ingredient. Here's this weeks meal plan:
Monday: Sweet apple chicken sausage sautéed with onion and granny smith apples in a maple reduction served with mashed new potatoes and roasted asparagus
Tuesday and Wednesday me and my husband have our respective bible study groups and will be left to fend for ourselves.
Thursday: Chicken Pot Pie and a side salad (gotta get those veggies people)
Friday: Venison Chili and size salad.
Saturday: Probably just candy since it's Halloween Party Night. Just kidding! We are still working out plans, but we probably won't be at home
Sunday: Leftovers Schmorgesborg. Waste not want not folks.
That's my week! Please forgive any typos. Its hard to blog on a teeny, tiny keyboard.
One of my best tools for staying organized and saving time is planning my meals for the week. This keeps us from eating out, eating frozen food, and me from having to make multiple trips to the grocery store for one missing ingredient. Here's this weeks meal plan:
Monday: Sweet apple chicken sausage sautéed with onion and granny smith apples in a maple reduction served with mashed new potatoes and roasted asparagus
Tuesday and Wednesday me and my husband have our respective bible study groups and will be left to fend for ourselves.
Thursday: Chicken Pot Pie and a side salad (gotta get those veggies people)
Friday: Venison Chili and size salad.
Saturday: Probably just candy since it's Halloween Party Night. Just kidding! We are still working out plans, but we probably won't be at home
Sunday: Leftovers Schmorgesborg. Waste not want not folks.
That's my week! Please forgive any typos. Its hard to blog on a teeny, tiny keyboard.
Monday, September 27, 2010
Oatmeal Nutella Whoopie Pies

Did I spell whoopie right? Whoopie pies were this years cupcake. It was the trendy thing to try to get creative with. So, when I saw this recipe on a blog I follow, Fat Girl Trapped In a Skinny Body, I had to give them a try. She is genius! These cookies are inspired! They are like homemade Oatmeal Cream Pies, but with Nutella instead of cream. They were soooooo good.
Oatmeal Nutella Whoopie Pies
from
Fat Girl Trapped In a Skinny Bodyfrom
Ingredients:
- 1 stick butter, room temp
- 1/2 cup brown sugar
- 1/4 cup Evaporated Cane Juice (or regular sugar)
- 1 egg
- 1 tsp vanilla extract
- 1 1/4 cup quick cooking oats
- 1/2 cup whole wheat flour
- 1 tsp baking soda
- 1/2 tsp salt
- 1/8 tsp cinnamon
- Nutella (about 1 tbsp per sandwich or more to taste)
Directions:
- Preheat the oven to 350 degrees. In a large bowl, beat the butter and sugars. Beat them for about a minute, then add the egg and vanilla.
Measure out the oats in a separate bowl, then sift in the flour, baking soda, salt and cinnamon. Slowly add the dry mix to the wet mix as you are mixing it until blended. - Scoop about 1-1.5 tbsp onto a lined baking sheet.
- Bake for 9-13 minutes depending on oven. The original recipe calle dor 11-13 minutes, but mine were fully done at 9.
- Cool on the pan for about 5 minutes then transfer to a wire rack to finish cooling. Cool the cookies completely before spread with Nutella and making the "pies".
Saturday, September 18, 2010
Strawberry Freezer Jam

I have never had the desire to make my own jam or jelly or can or preserve anything. Well, maybe I've thought about it, but knowing my lack of patience, I have always known I would never make it through the whole process without ripping my hair out. I have had freezer jam in the past, but never realized it could be made so easily. The fact is that I like freezer jam better than regular jam, and had I realized it was so easy to make I would have been making it all the time. I think it tastes so much fresher and true to the flavor of the fruit you use than cooked jam. This was my first attempt at freezer jam and it went off without a hitch. I will definitely be making this again. I can't wait to try other fruits too!
Strawberry Freezer Jam - adapted from Sure-Jell recipe
Ingredients
- 2 cups crushed strawberries (about 2 pints)
- 3 ½ cups sugar
- ¾ cup water
- 1 box of Sure-jell fruit pectin
Directions
- Crush the strawberries 1 cup at a time using a potato masher. Measure exactly 2 cups of crushed strawberries into a large bowl.
- Measure sugar and mix into fruit. The Sure-jell box suggests that using less than 4 cups of sugar will result in the jam not setting, but I decided to reduce the recipe to 3 ½ cups of sugar and it set just fine. Let sugar and fruit mixture sit for about 10 minutes stirring occasionally so that sugar dissolves.
- Stir box of pectin into ¾ cup water in a small saucepan. Bring to boil stirring constantly. Boil 1 minute while continuing to stir. Then remove from heat.
- Stir pectin mixture into fruit. Stir for about 3 minutes until all sugar is dissolved.
- Pour into prepared containers leaving ½ inch of space at the top for expansion in the freezer. Put lids on and let the jam stand at room temperature for 24 hours.
- Put the jam in the refrigerator or freezer. Jam will last in refrigerator for up to 3 weeks and in the freezer for up to one year.
Thursday, September 9, 2010
College Football Kickoff Sugar Cookies
Football season is upon us. Yippee! For me and my husband that means providing tailgate food for about 6-10 people every weekend there is a home game for the Clemson Tigers! With my new mission to expand my cooking horizons in full force, I have decided to use my fellow tailgaters as guinea pigs...er...um…I mean a taste testers for my some of my first attempt recipes. Muahahaha! This past weekend I made rolled sugar cookies for the first time (royal icing and all). What a pain in the tushy! It was way too time consuming of a task for my schedule last week and before it was over…wait…what am I talking about!? It’s not over! I still have 2 dozen un-iced football shaped sugar cookies in Tupperware on my counter Beware, this recipe makes a lot of cookies folks! (About 3-5 dozen depending on the size of your cookie cutter). I am not sure what to do with them. I’ll probably procrastinate doing anything with them until they’re stale and have to be thrown away. Anyway, I ended up taking a few short cuts with the icing on the 20 or so that I did ice that made the cookies look less than perfect, but I do think they tasted pretty good. So with out further ado, here is the recipe:

Rolled Sugar Cookies
From Jill Saunders
Ingredients:
- 1 1/2 cups butter, softened
- 2 cups white sugar
- 4 eggs
- 1 teaspoon vanilla extract
- 5 cups all-purpose flour
- 2 teaspoons baking powder
- 1 teaspoon salt
Directions:
1. In a large bowl, cream together butter and sugar until smooth. Beat in eggs and vanilla. Stir in the flour, baking powder, and salt. Cover, and chill dough for at least one hour (or overnight).
2. Preheat oven to 400 degrees F (200 degrees C). Roll out dough on floured surface 1/4 to 1/2 inch thick. Cut into shapes with any cookie cutter. Place cookies 1 inch apart on un-greased cookie sheets.
Bake 6 to 8 minutes in preheated oven. Cool completely.
Royal Icing
From: Martha Stewart Living 2006
Ingredients:
- 1 lb box of confectioners sugar
- 5tbsp meringue powder or 2 pasteurized egg whites (I used meringue powder because we had a pregnant lady attending the tailgate)
Directions:
In the bowl of an electric mixer fitted with the paddle attachment, combine sugar and meringue powder. Mixing on low speed, add a scant 1/2 cup water. For a thinner consistency, usually used for flooding, add more water. A thicker consistency is generally used for outlining and adding details. Mix until icing holds a ribbonlike trail on the surface of the mixture for 5 seconds when you raise the paddle. Use gel food colors to create the desired color for your icing

I was quite surprised at how hard it was to get the cut cookie from the counter to the pan. As you can see these cookies did not all turn out the same size. I was thinking next time I might will try to roll the dough out on parchment paper and remove the excess dough from around the shapes so they don’t have to be picked up and moved. The whole parchment paper could just be moved to the pan. I am not sure how it would effect the baking of the cookies though. We’ll try one day!
So after these cookies are completely cool you must ice them. The cookies themselves are not very sweet and the icing really makes the cookie. You are supposed to use a piping bag to pipe around the out line of your shape and then when the out line dries you are supposed to then thin your icing and fill the middle. This is where I started to cheat. It was about 11:00pm at night when I started this process (like I said busy week) and I do not have a steady hand. So not wanting to completely destroy the cookies beyond recognition by attempting fine decorating techniques I’ve never tried in the last hour of the day, I used a short cut suggested to me by my mother-in-law (Thanks Colleen!). I made my icing according the recipe above, colored it to as close to football brown as I could get them and then dipped the cookies top side down straight in the bowl of icing to coat them. The icing really smoothes itself out evenly over the cookie on its own while it dries. I let them dry on sheets of wax paper overnight and then woke up at 4:00 am to finish them the day of the game (I told you I was cramming this project in to my already busy week). First I had to take a paring knife to cut the cookies loose from the wax paper. Due the unorthodox way I iced these cookies, there was a lot of excess icing dripping over the edges. However once cut free, most of the cookies looked pretty good. Then I had to make another batch of the icing with no color in it for the laces. It was at this time that I discovered I did not have enough powdered sugar to make even half a batch of the icing. Luckily it was 4:00 am so I didn’t care anymore. I made what I icing I could (which turned out to me too thin) and gave laces to as many football cookies as the small batch would allow. The icing came out too thin and the laces did not hold their shape at all. The laces looked more like amoebas. Oh well. I served them at a football game so I figured if people didn’t know what I intended them to be it wasn’t me who would be the dummy. I will try these again, but I’m going to take a break for a while. These are a lot of work and not a good idea to make when you’re in a rush.
Wednesday, September 1, 2010
Everything Salmon Burgers
My husband and I love everything bagels and when I saw this Recipe I knew I had to make it! It fit perfectly with my efforts to incorporate more fish in to our diets too!


Everything Salmon Burgers with Scallion Cream Cheese Sauce
Ingredients:
- 4 (6-ounce) skinless salmon fillets, cut into large chunks
- 1 tablespoon grill seasoning, (recommended: Montreal Seasoning by McCormick)
- 1 tablespoon poppy seeds
- 1 tablespoon sesame seeds
- 3 tablespoons chopped fresh dill
- Extra-virgin olive oil for drizzling
- 1/2 cup softened Neufchatel cream cheese
- 3 scallions, whites and greens, chopped
- 1/2 cup light sour cream
- 1 teaspoon lemon juice
- Green leaf lettuce, for topping
- Sliced beefsteak or vine ripe tomato, for topping
- Sliced red onion, for topping
- Crusty kaiser rolls, split and toasted
Directions:
Preheat outdoor grill if using to medium high. Prepare hot grill with cooking spray. Indoors, use a large skillet rather than a grill pan and preheat with a drizzle of extra-virgin olive oil to medium-high heat.
Place salmon in food processor and pulse to coarse grind meat to form burgers. Transfer fish to a mixing bowl and season with grill seasoning, poppy seeds, sesame seeds, and dill. Mix and form 4 patties. Drizzle the burgers with extra-virgin olive oil.
Cook burgers 3 minutes on each side for a pink center, 4 to 5 minutes on each side for fully cooked fish.
While burgers cook, combine in a bowl the cream cheese and the scallions and fold in sour cream and lemon juice.
Top the burgers with lettuce, tomato, onion and sauce on crusty, toasted buns.
Back On The Housekeeping Horse
No, I don't have a horse that I ride around my house when I clean. Come on people!
I have been a slack on my commitment to learn a new routine to make cleaning part of my everyday. This is a brief statement of intent to declare I am re-committing myself to the process. It's hard to get up so early and be immediately productive, but I really do feel it is important.
I will report back with any new and interesting discoveries I encounter along the way.
Now if I can just get my husband to help...hmmmm.
I have been a slack on my commitment to learn a new routine to make cleaning part of my everyday. This is a brief statement of intent to declare I am re-committing myself to the process. It's hard to get up so early and be immediately productive, but I really do feel it is important.
I will report back with any new and interesting discoveries I encounter along the way.
Now if I can just get my husband to help...hmmmm.
Monday, August 30, 2010
Stinky Trash Can No More!!
I have struggled with my trash can stinking for so long. The odor had basically absorbed into the plastic and would NOT go away. I had tried EVERYTHING. Bleach, Lysol products, air fresheners, etc. None of this worked.
This weekend, as a last stitch effort, I gave a "green" cleaner a try. I have had very little faith in green cleaning methods (for no good reason) until now. I mixed baking soda and white distilled vinegar in that stinky old trash can, gave it a scrub, then let it soak for a bit. Voila! My trash can smells like plastic. Not stinky garbage, not vinegar (which I was concerned about)...clean plastic!
I was blown away. Maybe there is something to these homemade cleaning products. It has seriously peaked my interest and I may be looking further into this whole green cleaning thing very soon.
This weekend, as a last stitch effort, I gave a "green" cleaner a try. I have had very little faith in green cleaning methods (for no good reason) until now. I mixed baking soda and white distilled vinegar in that stinky old trash can, gave it a scrub, then let it soak for a bit. Voila! My trash can smells like plastic. Not stinky garbage, not vinegar (which I was concerned about)...clean plastic!
I was blown away. Maybe there is something to these homemade cleaning products. It has seriously peaked my interest and I may be looking further into this whole green cleaning thing very soon.
Grilled Eggplant Parmesan
I saw this made on the TV show "Just Cook This with Sam the Cooking Guy" on Fit TV. It looked so delicious I HAD to try it. I had one small hiccup though. I had never eaten eggeplant (I know, I know...what planet do I live on right?). Come to find out I may not be the biggest fan of this vegetable, however...I think eggplant lovers would love this, so I am sharing. Let me know! The picture was taken with my phone, so I apologize if it's fuzzy.

Grilled Eggplant Parmesan
adapted from Sam the Cooking Guy
- 1 large globe eggplant - or 2 smaller ones
- 3 large tomatoes
- 4 slices mozzarella cheese
- 4 crusty Italian type rolls, split in half
- 1/3 cup shredded parmesan cheese
- 1 bunch fresh basil
- Olive oil
- Kosher salt
- Fresh Ground Pepper
- Garlic powder
- Italian seasonings
Directions:
Cut eggplant & tomatoes to get eight 1/4 inch slices of each. Brush eggplant and bread with olive oil. Season eggplant and tomatoes with salt and pepper. Sprinkle some garlic powder and Italian seasoning on inside of bread.
Grill eggplant on both sides until soft and marked with grill lines. Do the same with tomatoes, but for about half the eggplant time. Toast the bread on the grill as well.
Heat broiler. Assemble sandwiches in this order...
2 slices of eggplant, 2 slices of tomato, 3 large basil leaves, mozzarella cheese and finally about 2 tablespoons of parmesan.
Place open-face under broiler to melt cheese and brown the top - but don't go far you don't want them to burn. Place tops on and slice in half.
Thursday, July 15, 2010
La Bete Noir - Flourless Chocolate cake
La Bete Noir means "the dark (or night) beast". This flourless chocolate cake is so rich and delicious, one slice should do you in. My husband has requested this cake for his birthday dinner this weekend. I made it last night and it turned out the best it ever has for me. Enjoy!
Ingredients
Cake
Ganache
Lightly sweetened whipped cream for topping
Preparation
For cake:
Preheat oven to 350°F. Butter 10-inch-diameter springform pan. Line bottom of pan with parchment round; butter parchment. Wrap 3 layers of heavy-duty foil around outside of pan, bringing foil to top of rim. Combine 1 cup water and sugar in small saucepan. Bring to boil over medium heat, stirring until sugar dissolves. Simmer 5 minutes. Remove from heat.
Melt butter in large saucepan over low heat. Add chocolate and whisk until smooth. Whisk sugar syrup into chocolate; cool slightly. Add eggs to chocolate mixture and whisk until well blended. Pour batter into prepared pan. Place cake pan in large roasting pan. Add enough hot water to roasting pan to come halfway up sides of cake pan.
Bake cake until center no longer moves when pan is gently shaken, about 50 minutes. Remove from water bath; transfer to rack. Cool completely in pan.
For ganache:
Bring whipping cream to simmer in small saucepan over medium heat. Remove from heat. Add chocolate and whisk until smooth. Pour over top of cake still in pan. Gently shake pan to distribute ganache evenly over top of cake. Refrigerate cake in pan until ganache is set, about 2 hours.
DO AHEAD: Can be made 2 days ahead. Cover and keep refrigerated.
Run knife around pan sides to loosen cake; release sides. Cut cake into wedges and serve with whipped cream.
Ingredients
Cake
- 1 cup water
- 3/4 cup sugar
- 9 tablespoons (1 stick plus 1 tablespoon) unsalted butter, diced
- 18 ounces bittersweet (not unsweetened) or semisweet chocolate, chopped
- 6 large eggs
Ganache
- 1 cup heavy whipping cream
- 8 ounces bittersweet (not unsweetened) or semisweet chocolate, chopped
Lightly sweetened whipped cream for topping
Preparation
For cake:
Preheat oven to 350°F. Butter 10-inch-diameter springform pan. Line bottom of pan with parchment round; butter parchment. Wrap 3 layers of heavy-duty foil around outside of pan, bringing foil to top of rim. Combine 1 cup water and sugar in small saucepan. Bring to boil over medium heat, stirring until sugar dissolves. Simmer 5 minutes. Remove from heat.
Melt butter in large saucepan over low heat. Add chocolate and whisk until smooth. Whisk sugar syrup into chocolate; cool slightly. Add eggs to chocolate mixture and whisk until well blended. Pour batter into prepared pan. Place cake pan in large roasting pan. Add enough hot water to roasting pan to come halfway up sides of cake pan.
Bake cake until center no longer moves when pan is gently shaken, about 50 minutes. Remove from water bath; transfer to rack. Cool completely in pan.
For ganache:
Bring whipping cream to simmer in small saucepan over medium heat. Remove from heat. Add chocolate and whisk until smooth. Pour over top of cake still in pan. Gently shake pan to distribute ganache evenly over top of cake. Refrigerate cake in pan until ganache is set, about 2 hours.
DO AHEAD: Can be made 2 days ahead. Cover and keep refrigerated.
Run knife around pan sides to loosen cake; release sides. Cut cake into wedges and serve with whipped cream.
Tuesday, July 13, 2010
Creamy Ham Casserole
I am always interested in a good freezable meal. This casserole is not only yummy, but it is lower in fat than your typical casserole. My friend Erika made it for our bible study the other night and no one could believe it was reduced fat. I just had to share!
Creamy Ham Casserole
from Cooking Light magazine
Ingredients:
Directions:
Ingredients:
- 4 ½ cups uncooked medium egg noodles (I use no-yolks)
- 2 quarts boiling water
- 2 cups broccoli florets
- 1 cup skim milk
- 1 (10 ¾ ounce) can condensed, reduced fat, reduced sodium cream of mushroom soup, undiluted
- 2 cups (8 oz.) reduced fat shredded Cheddar cheese, divided
- 1 (6 oz.) tub light cream cheese with chives and onion, softened
- 2 cups chopped lean ham
- 1 cup chopped carrot
- cooking spray
- 1 cup fat free herb flavored croutons, crushed
Directions:
- Preheat oven to 350.
- Cook noodles in 2 quarts boiling water for 2 minutes.
- Add broccoli and cook 3 minutes. Drain
- Combine milk, soup, 1 cup Cheddar cheese, and cream cheese in a large bowl and stir well with a whisk.
- Add noodles mixture, ham, and carrot and stir well.
- Divide noodle mixture evenly between 2, 8 inch, square baking dishes coated with cooking spray.
- Combine remaining 1 cup Cheddar cheese and crouton crumbs; toss well.
- Sprinkle crumb mixture evenly over casseroles.
- Wrap unbaked casseroles with heavy- duty foil.
- Place frozen casseroles on a baking sheet.
- Bake, covered at 350 for 1 hour.
- Uncover and bake an additional 15 minutes.
*You can freeze up to 3 months!
Monday, June 28, 2010
Dr. Pepper Ribs
We made these ribs for Father's Day for my Dad who is an excellent grill master himself. I was a little nervous to be honest. The recipe was passed along to us by our friend Kenny (thanks buddy!). We were so impressed with ourselves (and so was my Dad!), that I just had to share! We will definitely make again!
How to Make It:
What You'll Need:
- Ribs
- 2 liter Dr. Pepper
- 1/4 cup of salt
- Chili powder
- 1/2 Tbsp canola or vegetable oil
- 1/2 onion, minced
- 1 clove garlic, minced
- 1/2 cup ketchup
- 2 Tbsp Worcestershire sauce
- 2 Tbsp cider vinegar
- 1/8 tsp cayenne pepper
How to Make It:
- Place the ribs in a large baking dish. Pour in Dr. Pepper to cover them, reserving at least 1/2 cup for the sauce. Add the salt and soak the ribs in the fridge overnight.
- Heat the oven to 350. Remove the ribs from the liquid, dry them, and rub with the chili powder. Place them on a baking dish, add 1 cup of water, and cover tightly with foil. Cook for 2 hours, until the meat nearly falls off the bone.
- For the barbeque sauce, heat the oil in a saucepan over medium heat. Saute the onion and garlic until they're soft and fragrant, and add the ketchup, Worcestershire, vinegar, cayenne, and 1/2 cup of Dr. Pepper. Simmer for 15 to 20 minutes, or until the sauce thickens.
- Fire up the grill, and brush the ribs with the sauce. When the grill is hot, cook them bone side down on a cooler part for 10 to 15 minutes. Flip them and cook until lightly charred and smoky. Remove, and brush on more sauce.
Monday, June 21, 2010
Progress Report – Routines
I have been practicing my routines for a week now and I have noticed that my house is staying more orderly. There are some things that I have been doing religiously with very little effort. There are other things that I have been skipping. Some because they do not need to be done and some because I just can’t bring myself to do them. Here’s a rundown of what’s working very well and what still needs tweaking:
Already a habit
Morning: Make coffee (didn’t have to twist my arm too hard), empty dishwasher/put away dishes, Eat breakfast, and the getting ready stuff.
Evening: Clean out car (one day I forgot an empty Diet Pepsi can), sort car stuff, Make dinner, Open mail, and pack gym bag
Have done, but have also skipped
Morning: Vitamin (I only remembered it once), Quiet time and prayer, and Weekday chores
Evening: Doing dishes, scrubbing sink (I couldn’t scrub the sink on the days I didn’t do the dishes since it was full), Wipe stove and counters, weekday chore, checking on my to do lists
Skipped but it didn’t need to be done
Evening: Changing Laundry loads, Run dishwasher, and Setting out tomorrows dinner (we ate some leftovers)
Just plain didn’t do it!
Morning: Making to do lists (I keep waiting to do this at work. Shame, shame) and abs workout (anyone surprised? Ha!).
Evening: Pack lunches (I kept leaving it until the morning), Fold laundry (I didn’t do this even once. Laundry is my arch nemesis), and layout clothes for next day (I couldn’t bring myself to do it – I didn’t care yet)
So, you can see this is a work in progress. There are some things I just need to buckle down and do and some things I may adjust. For instance, I was thinking of maybe getting showered and dressed sooner in my morning routine so I feel more awake. We’ll see. I am going to work on it this week. I already half failed this morning. I did not put away the dry dishes, have my quiet time, do abs, water plants, or make to do lists. Tomorrow morning I am going to try an adjusted schedule and see if it gets me going better!
Subscribe to:
Posts (Atom)